15 October 2012
14 October 2012
Bobol Wifi

Sapa bilang wifi/hotspot yang sudah di proteksi dengan password tidak bisa di bobol. Bagi kalian yang dirumahnya dekat dengan area hotspot tapi tidak bisa ikut menggunakannya karena di proteksi password, ini ada tools yang ampuh untuk membobol password wifi di area sekitar kalian.
Ga usah pusing-pusing cukup dengan satu aplikasi yang ukuranya saja sangat kecil. Software nya bernama wzcook, dengan software ini anda akan gampang menjebol jaringan wireless/hotspot sekitar yang anda mau.
Tentunya yang telah dipasangi password oleh si pemiliknya, adapaun cara utk menggunakan wzcook ini,anda hanya membutuhkan sebuah laptop yang menyimpan aplikasi wzcook tsb dan jaringan Wireless tentunya. anda cukup menjalankan wzcook dan secara otomatis akan mencari jaringan Wireless beserta passwordnya,setelah itu anda tinggal menggunakan access Wireless tsb dgn gratis…
Langsung aja biar gak lama-lama, cara menggunakan wzcook.
1. Langkah pertama kita menggunakan netcut untuk melihat user yang sedang online di area hotspot. bisa juga menggunakan ip scanner lainnya. untuk netcut bisa di download di postingan sebelumnya Free Software Pemutus Koneksi Internet Wifi (NetCut)
instal dan jalankan netcut, copy ip dan mac address calon korban. (nah disini anda harus mencoba satu-satu IP user yg online, sampai menemukan user unlimit, supaya kita juga dapat gratisnya unlimit
gampanganya dengan cara mengamati ip mana yg paling sering online.
catat IP, Mac Address serta Gatewaynya.
2. disconnect WIFI di laptop kita (termasuk Netcut).

kemudian ganti ip Laptop kita sesuai ip korban yang udah anda copy kan tadi:
masukan IP(contoh ip yg saya copy 192.168.2.29), Subnet Mask(255.255.255.0), dan Default Gateway (default gateway hotspot; pada contoh 192.168.2.1).
sedangkan DNSnya terserah anda, (pada gambar gw menggunakan dns dari google).
lalu ganti mac address kita sesuai Mac Address korban (jangan lupa hilangkan dulu tanda titik dua “:”)


merubah mac address
buka browser kesayangan anda dan jrengg….kalo anda berhasil, anda akan terkoneksi hotspot/wifi tanpa melewati halaman login hotspot terlebih dahulu.
Kalau anda masih juga kurang puas dengan bandwith yang di dapatkan, gunakan aja senjata (netcut) untuk memutuskan koneksi user lain yang sedang online (tapi jangan gatewaynya). bandwith akan menjadi milik anda seutuhnya…
Selamat mencoba ^_^
Jagalah Emosi Kita Dalam Bersosialisasi

TERNYATA apabila kita MARAH selama 5 menit saja, imunitas sistem tubuh kita akan depressi 6 jam.
Dendam, menyimpan kepahitan, imunitas tubuh kita mati. Disitulah bermula awal segala penyakit, STRESS, Kolesterol tinggi, pemicu Darah Tinggi, Jantung, rheumatik, arthritis, Stroke (perdarahan/penyumbatan pembuluh darah).
Jika kita sering membiarkan diri kita STRESS, maka kita sering mengalami GANGGUAN PENCERNAAN.
Jika kita sering merasa KHAWATIR, maka kita mudah terkena penyakit NYERI PUNGGUNG.
Jika MUDAH TERSINGGUNG, maka kita akan cenderung terkena penyakit INSOMNIA (susah tidur).
Jika sering mengalami KEBINGUNGAN, maka kita akan terkena GANGGUAN TULANG BELAKANG BAGIAN BAWAH.
Jika sering membiarkan diri kita merasa TAKUT yang BERLEBIHAN, maka kita akan mudah terkena penyakit GINJAL.
Jika suka ber-NEGATIVE THINKING, maka kita akan mudah terkena DYSPEPSIA (penyakit sulit mencerna).
Jika kita mudah EMOSI dan cendrung PEMARAH, maka kita bisa rentan terhadap penyakit HEPATITIS.
Jika kita sering merasa APATIS (tidak pernah peduli) terhadap lingkungan, maka kita akan berpotensi mengalami PENURUNAN KEKEBALAN TUBUH.
Jika sering MENGANGGAP SEPELE semua persoalan, maka hal ini bisa mengakibatkan penyakit DIABETES.
Jika kita sering merasa KESEPIAN, maka kita bisa terkena penyakit DEMENSIA SENELIS (memori dan kontrol fungsi tubuh berkurang).
Jika sering BERSEDIH dan merasa selalu RENDAH DIRI, maka kita bisa terkena penyakit LEUKEMIA (kanker darah putih).
Mari kita selalu BERSYUKUR atas segala perkara yang telah terjadi, karena dg bersyukur, maka "hati" ini menjadi BERGEMBIRA dan menimbulkan ENERGI POSITIF dalam tubuh utk mengusir segala penyakit-penyakit tersebut diatas.(HATI Yg GEMBIRA adalah OBAT) So,,,nikmati hidup dg sll menjadi PEMENANGnya .
10 October 2012
Mengatasi Error “Consider Replacing Your Battery” Pada Batterai Laptop
Bagi anda seorang pengguna Windows 7, anda mungkin pernah atau bahkan sedang mengalami sebuah masalah dimana dari laptop anda muncul sebuah pesan error (error message) berupa kalimat “Consider Replacing Your Battery”. Jikapun anda belum mengalaminya, error message sangat mungkin muncul di kemudian hari. Pesan error tersebut biasanya muncul dengan disertai berubahnya ikon baterai laptop anda menjadi terdapat tanda silang pada ikon baterai di system tray.
Perlu anda ketahui bahwa error message di atas muncul di saat Windows 7 mendeteksi kapasitas baterai laptop anda yang sudah berkurang di bawah 40% dari kapasitas baterai yang semula. Dengan demikian, Windows 7 menyarankan baterai laptop anda sudah selayaknya untuk diganti.
 Kemampuan Windows 7 yang begitu akurat dalam hal penghitungan kapasitas baterai dibandingkan dengan Windows versi sebelumnya membuat error message yang cukup mengganggu lebih mudah muncul. Pesan error ini muncul ketika pengurangan kapasitas baterai di atas 20%.
Untuk mengatasi masalah error message ini, yang dapat kita lakukan adalah dengan segera melakukan recharge baterai yang sedang Anda pakai. Caranya cukup dengan memasang kabel daya listrik ke dalam stop kontak listrik.
Sedangkan untuk mencegah pesan yang sama muncul kembali, kita harus melakukan perawatan baterai laptop dengan baik karena dari pihak Windows 7 sendiri belum ada perbaikan ataupun pembaruan mengenai kemampuan akuratnya itu.
Adapun perawatan baterai laptop yang dapat kita lakukan adalah :
")
")
")

")
Hal ini merupakan salah satu cara yang dapat kita lakukan dalam menyiasati solusi mengatasi masalah yang dimaksud. Jika anda tidak melakukan langkah yang telah disebutkan di atas, kemungkinan untuk munculnya error message ini sangat besar. Pesan ini akan terus muncul dan baterai jadi error yang terkadang dapat membuat panik dan tak jarang mengganggu kinerja kita.
Read more
Perlu anda ketahui bahwa error message di atas muncul di saat Windows 7 mendeteksi kapasitas baterai laptop anda yang sudah berkurang di bawah 40% dari kapasitas baterai yang semula. Dengan demikian, Windows 7 menyarankan baterai laptop anda sudah selayaknya untuk diganti.
Untuk mengatasi masalah error message ini, yang dapat kita lakukan adalah dengan segera melakukan recharge baterai yang sedang Anda pakai. Caranya cukup dengan memasang kabel daya listrik ke dalam stop kontak listrik.
Sedangkan untuk mencegah pesan yang sama muncul kembali, kita harus melakukan perawatan baterai laptop dengan baik karena dari pihak Windows 7 sendiri belum ada perbaikan ataupun pembaruan mengenai kemampuan akuratnya itu.
Adapun perawatan baterai laptop yang dapat kita lakukan adalah :
1. Charge baterai laptop anda sampai pada kapasitas maksimum/penuh (100%)
2. Biarkan baterai beristirahat dalam keadaan terisih penuh selama kurang lebih 2 jam agar supaya baterai menjadi dingin dari proses pengechasan. Anda dapat menggunakan laptop anda secara normal selama proses ini.
3. Lepaskan colokan charger dari komputer dan atur laptop untuk hibernasi secara otomatis pada persentase minimum yang masih memungkinkan seperti langkah-langkah pada gambar dibawah ini:
a.
")
b.
")
c.
")
d.

e.
")
4. biarkan laptop berhibernasi (hybernate) tanpa terchas sampai komputer akan terhibernasi sendiri. Anda dapat menggunakan laptop secara normal selama proses ini.
5. saat komputer telah tersutdown oleh proses hibernasi, biarkan laptop anda tetap dalam keadaan mati selama 5 jam atau lebih.
6. chas laptop anda ( non stop) sampai indikasi baterai mencapai 100%. anda dapat mngoperasikan laptop anda selama proses pengechasan.
Klo semua sudah dilakukan dengan benar,indikator waktu pengoperasian baterai pada laptop anda akan menunjukkan waktu yang sebenarnya.
Lalu bagaimana anda tahu baterai laptop anda telah terisi penuh? Jika anda perhatikan, ketika baterai sedang dalam keadaan di-recharge alias sedang diisi ulang, terdapat lampu indikator pada laptop yang menandakan baterai sedang diisi ulang dan masih perlu di-charge atau telah penuh. Warna lampu indikatorcharge di setiap laptop dapat saja berbeda, salah satunya adalah ketika baterai tengah diisi ulang dan belum penuh maka lampu indikator menyala berwarna oranye. Sedangkan ketika baterai laptop anda penuh dan itu menandakan anda sudah saatnya melepaskan charger baterai dan menyelesaikan proses charge adalah dengan menyalanya lampu indikator berwarna biru. Dan itu saatnya anda melepas charger dan dapat bekerja kembali, menyalakan laptop dan melanjutkan aktifitas anda bersama laptop anda. Setelah anda melakukan langkah ini, pastikan anda selalu memeriksa baterai laptop anda jangan sampai kosong.Hal ini merupakan salah satu cara yang dapat kita lakukan dalam menyiasati solusi mengatasi masalah yang dimaksud. Jika anda tidak melakukan langkah yang telah disebutkan di atas, kemungkinan untuk munculnya error message ini sangat besar. Pesan ini akan terus muncul dan baterai jadi error yang terkadang dapat membuat panik dan tak jarang mengganggu kinerja kita.
08 October 2012
Cara Memasang Readmore di Blogger Template Default
Sayangnya, blogger template default bawaan blogger belum dilengkapi dengan fasilitas readmore. Jadi jika anda ingin tetap memakai template bawaan blogger, namun ingin memiliki tampilan readmore di beranda situs anda, maka diperlukan beberapa hack pada templatenya.
Berikut ini adalah langkah-langkah yang diperlukan untuk membuat opsi readmore dalam sebuah blogger template default.
Login ke akun blogger anda.
Masuk ke dashboard blog anda -->rancangan-->edit HTML-->centang expand template widget (sebelumnya jangan lupa untuk backup template anda)
Temukan kode berikut (gunakan Ctrl+F).
</head>
Letakkan kode di bawah ini tepat di atas kode tadi.
<script type='text/javascript'>
var thumbnail_mode = "float" ;
summary_noimg = 300;
summary_img = 170;
img_thumb_height = 150;
img_thumb_width = 250;
</script>
<script src='http://panduanbelajarblog.googlecode.com/files/readmore-otomatis.js' type='text/javascript'/>
var thumbnail_mode = "float" ;
summary_noimg = 300;
summary_img = 170;
img_thumb_height = 150;
img_thumb_width = 250;
</script>
<script src='http://panduanbelajarblog.googlecode.com/files/readmore-otomatis.js' type='text/javascript'/>
Selanjutnya temukan kode berikut.
<data:post.body/>
Gantikan/hapus kode di atas dengan kode ini.
<b:if cond='data:blog.pageType == "item"'>
<data:post.body/>
<b:else/>
<b:if cond='data:blog.pageType == "static_page"'>
<data:post.body/>
<b:else/>
<div expr:id='"summary" + data:post.id'>
<data:post.body/>
</div>
<script type='text/javascript'>
createSummaryAndThumb("summary<data:post.id/>");
</script>
<div style='clear: both;'/>
<span style='padding-top:5px;;float:right;text-align:right;'><a expr:href='data:post.url' rel='bookmark'><b>Read more</b></a></span>
</b:if>
</b:if>
Anda bisa mengganti tulisan read more sesuai keinginan anda. Misalnya, baca selengkapnya... dll.
Simpan hasil editing template anda. Lalu lihat hasilnya.
Jika anda melakukannya dengan benar, fasilitas readmore sudah muncul di beranda blog anda.
Selamat mencoba
Simpan hasil editing template anda. Lalu lihat hasilnya.
Jika anda melakukannya dengan benar, fasilitas readmore sudah muncul di beranda blog anda.
Selamat mencoba
sumber : http://pasartokoonline.blogspot.com/2012/03/memasang-readmore-di-blogger-template.html
Remove a Person From a Photo With Photoshop CS5’s Content Aware Feature
Final Product What You'll Be Creating

With the launch of the new Adobe Suite of programs comes the long awaited Adobe Photoshop CS5. Packed with new features to speed up your workflow it truly is the most advanced edition of Photoshop to date. One of the new features we will be looking at today is called Content Aware. This feature allows you to quickly fill in a selection with surrounding content making it look like a part of the original image. In this case we will choose to remove a person from a photo, this can be done in less than five minutes. With the additional image enhancements this tutorial will take you less than 10 minutes to complete.
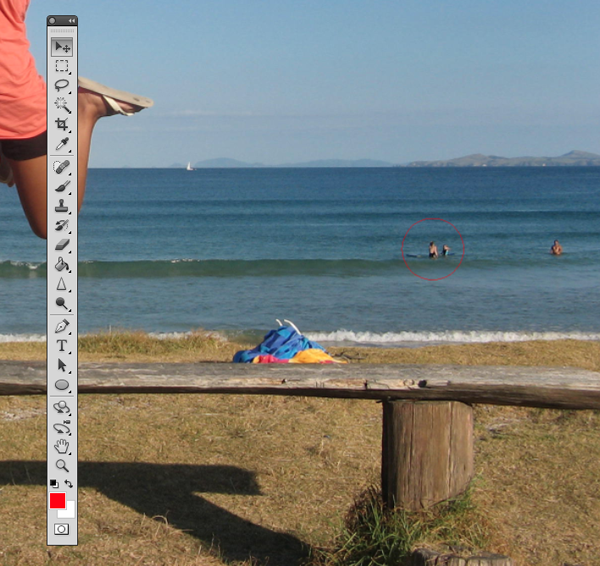
Original Image
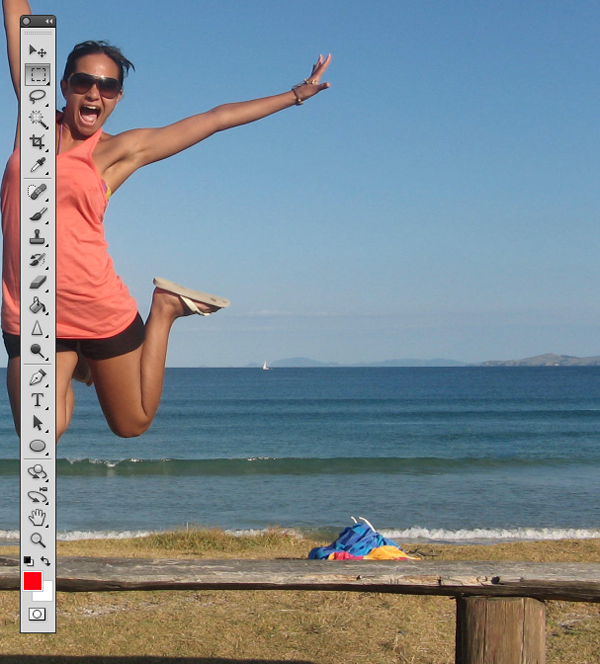
Before we begin, download the image that we will be working with. As you can see, there are two individuals in this photo. In today’s tutorial, we will use Photoshop CS5′s Content Aware Feature to remove the man on the left.
Step 1
Using the content aware tool on different images produces different results. An image with a gradient background such as the sky in this image is quite tricky to work with. Open beach.jpg in Photoshop.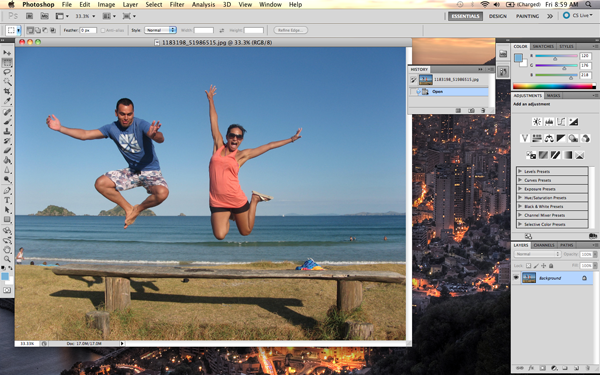
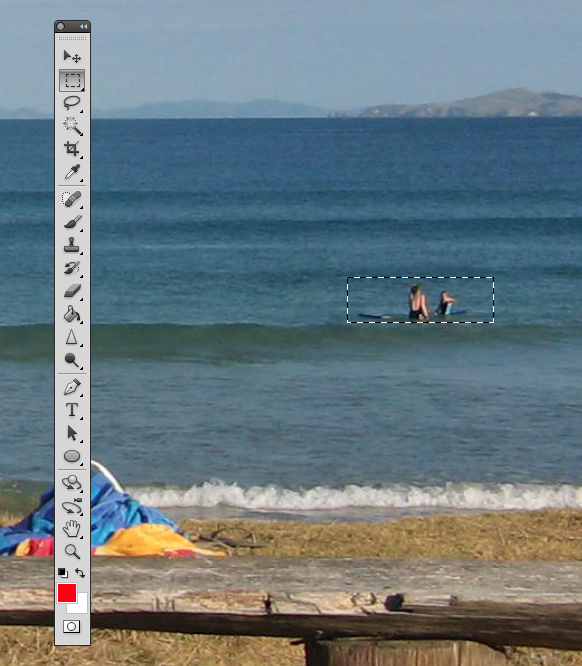
Step 2
We are extracting the person on the left from this photo. Using the Pen Tool, (P) Begin by making a path around the subject. The nice thing about using content aware is that you do not have to be exact when making a selection. In fact, do your best not to cut too close to the subject.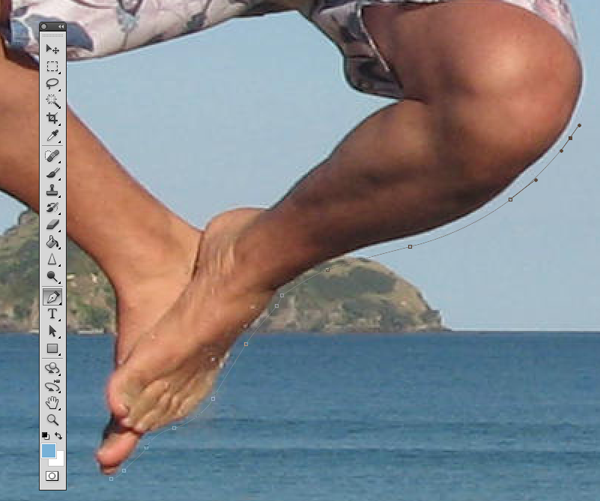


Step 3
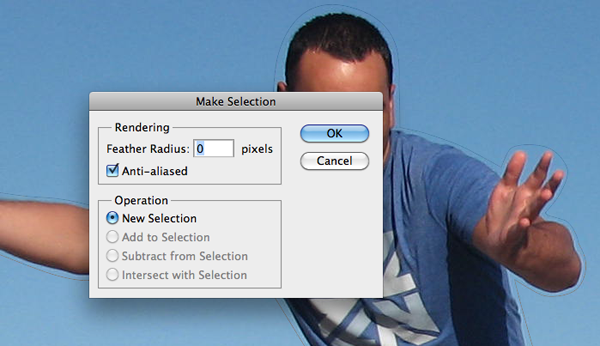
Once you complete the path around the subject, turn it into a selection. This can be done by right clicking on the path and selecting Make Selection.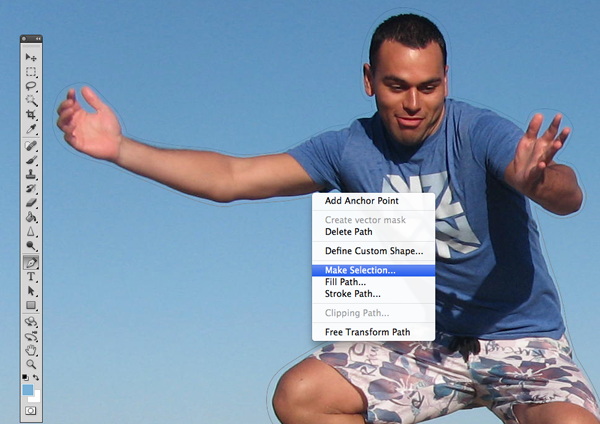
Step 4
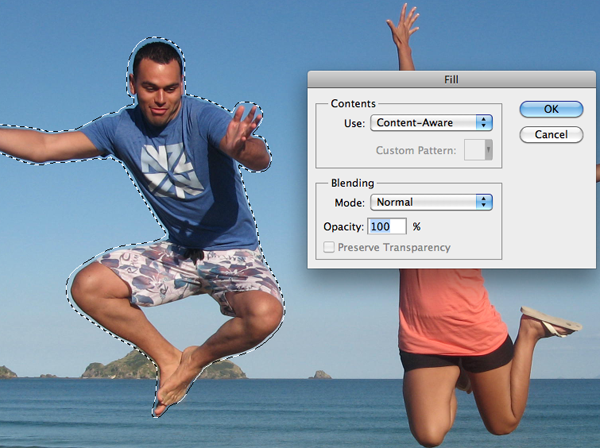
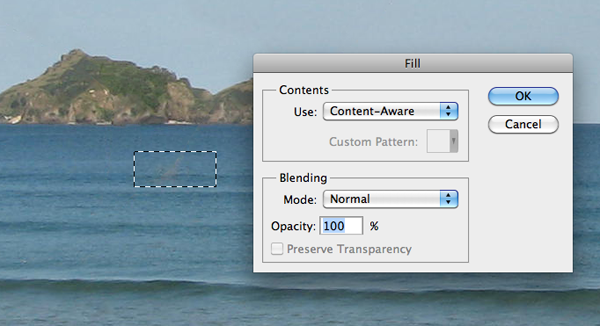
Now we have an active selection around our subject. In this step we will make the subject disappear from the image using Content Aware Fill. To do this, go to Edit > Fill.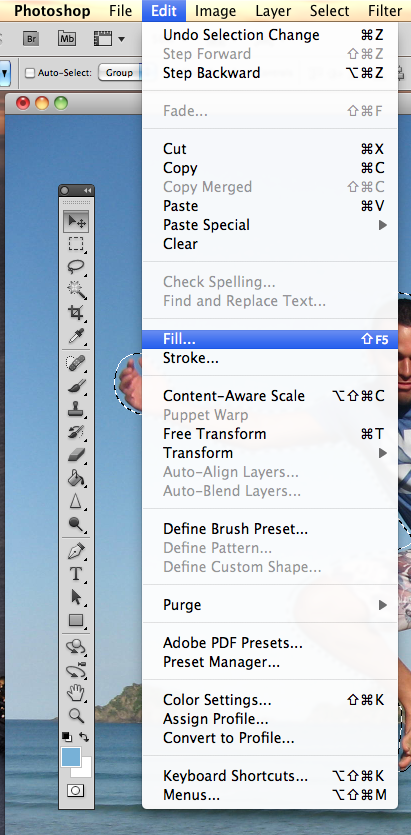


Step 5
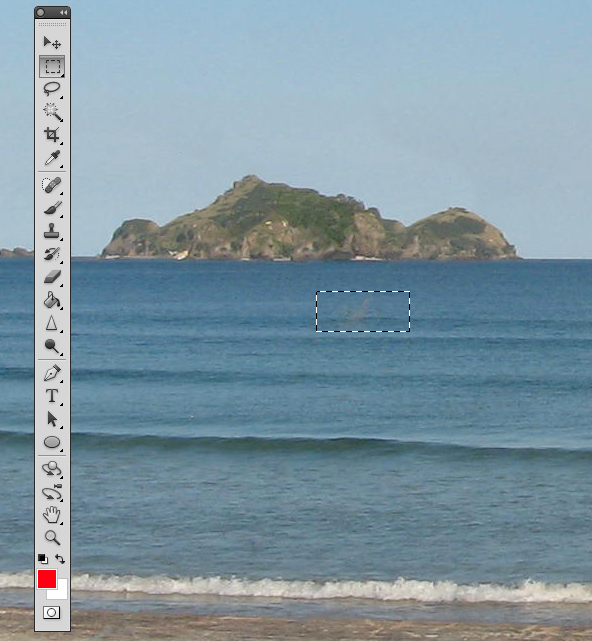
In this step we will remove some of the other artifacts in the image using the same process. The content aware tool did miss a spot where the subject’s foot originally was. To do this, draw a rectangle around the area using the rectangle selection tool. And use the content aware fill as we have done in the previous steps.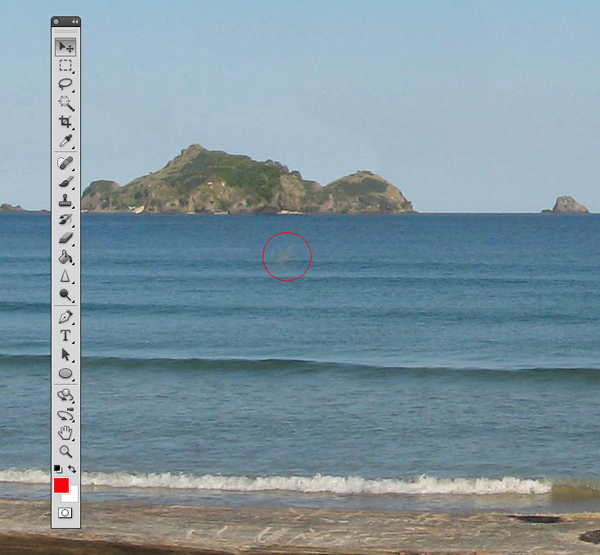
Step 6 (Optional)
Using the Crop Tool (C) lets crop the image so that the focus is drawn to the woman jumping. To do this, just crop out an area of the image that you would like to keep. Beware of the shadow that is left behind from the person that we have removed. You can use the Content Aware feature to remove this shadow but I have decided to crop it out altogether.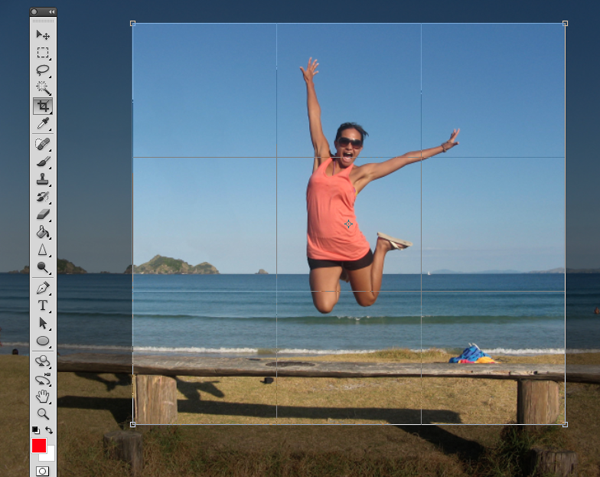
Step 7 (Optional)
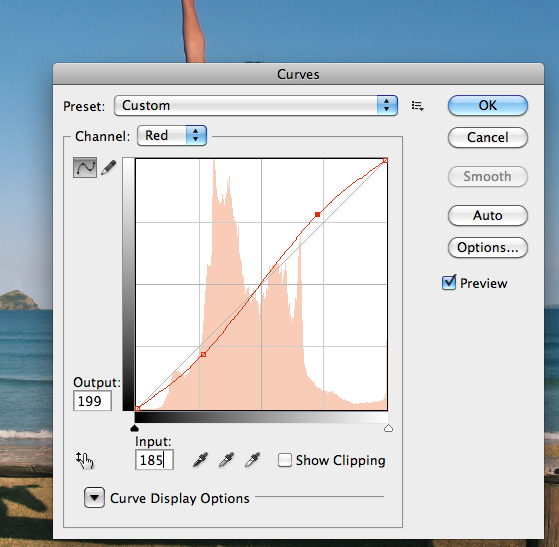
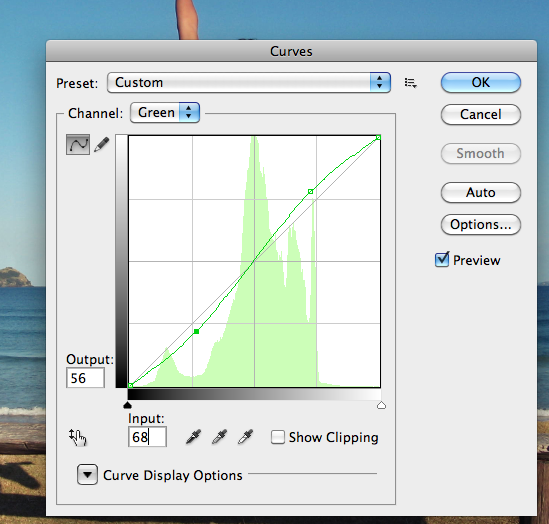
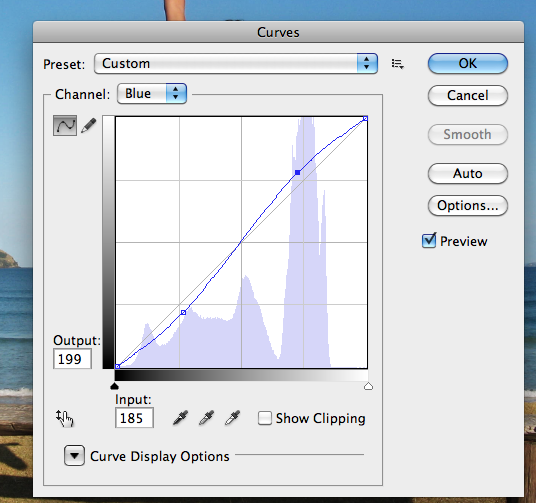
In this step we will enhance the photo by giving it a more vibrant look. The colors currently appear somewhat dull. There are many ways to accomplish this but we will use Color Curves. To do this, go to Image > Adjustments > Curves, (Cmd + M). A dialog box will pop-up and we will select each of the channels, R, G, B and work on them separately. Select the Red channel from the dropdown menu.We are going to make two points on the graph. One in the bottom of the top right square, and one in the top of the bottom left square.
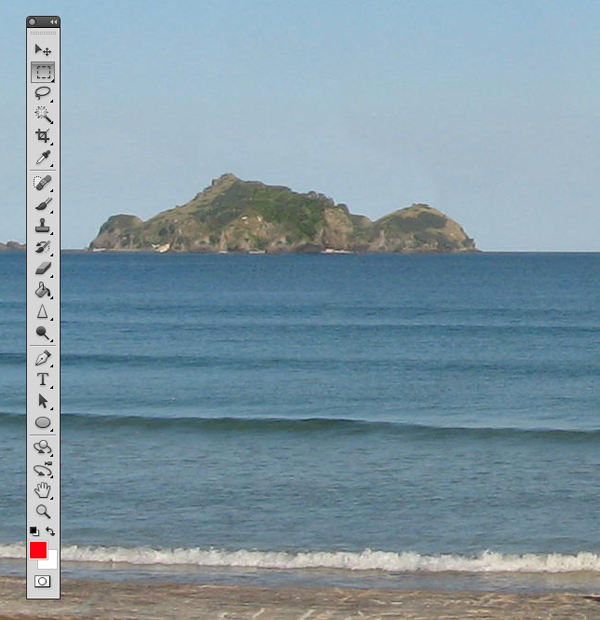
Final Image
Your image should now look something like the one seen below. As you can see, we have removed the man on her left with very little effort using Photoshop CS5′s new Content Aware Feature.
Disable or Stop Auto CHKDSK During Windows Startup
One of Windows annoying so called “features” is the Windows disk checker (Check disk) being automatically executed whenever you don’t shut down your computer properly. The blue colored screen appears on Windows XP or black colored screen for Windows 7 during boot that says:

 -->
-->
There are people who suggest to edit the registry but the proper and safer way to disable Check disk (Chkdsk) from starting up is using the /x switch on the chkntfs command in command prompt. This switch will exclude a drive from the default boot-time check. To get to the command prompt, go to Start -> Run (or Win key+R) -> type cmd and press enter. If you have drive C: as your hard drive, then the command to disable chkdsk from scanning the C: drive would be:
HKEY_LOCAL_MACHINE\SYSTEM\CurrentControlSet\Control\Session Manager
The default value for the BootExecute entry is autocheck autochk *. When you use the /x switch in chkntfs, it will add a /k parameter before the asterisk. This parameter excludes volumes from being checked for the presence of a dirty bit.
For example, if I run the command “chkntfs /x c:” in a command prompt, this would modify the registry entry to autocheck autochk /k:c *

There are some experts who believe that it is better not to disable Check disk from scanning your hard drive. But as for me, I don’t want it to scan my hard drive because if it finds anything bad, damaged files will be changed to File00001.CHK. When that happens, I’ll have to use data recovery software or some third party tools to recognize and recover the CHK files.
You can also use the chkntfs command to reset the BootExecute registry value back to the default of autocheck autochk * if you need to for any reason.
Read more
Checking file system on C:Simply pressing any key would stop Check disk from running but when you restart your computer, you’ll get this prompt again because Windows still thinks the drive needs scanning and will keep reminding you until it is checked. Sometimes, even after letting Check disk scan the drive that it wants to, the checking process would still automatically run at next boot! Here’s how to disable or stop Check disk from scanning your drives at Windows bootup for Windows XP, Vista and 7.
The type of the file system is NTFS.
One of your disks needs to be checked for consistency. You may cancel the disk check, but it is strongly recommended that you continue.
To skip disk checking, press any key within 10 seconds(s).
There are people who suggest to edit the registry but the proper and safer way to disable Check disk (Chkdsk) from starting up is using the /x switch on the chkntfs command in command prompt. This switch will exclude a drive from the default boot-time check. To get to the command prompt, go to Start -> Run (or Win key+R) -> type cmd and press enter. If you have drive C: as your hard drive, then the command to disable chkdsk from scanning the C: drive would be:
chkntfs /x c:If you have a second drive to exclude, C: and D: for example, you can disable Check disk with the command below. Simply add all the drives you want to exclude in this way.
chkntfs /x c: d:The chkntfs utility works by modifying the BootExecute value in the system registry which is what Windows looks at during boot. For the curious, the BootExecute value is located in the following registry key:
HKEY_LOCAL_MACHINE\SYSTEM\CurrentControlSet\Control\Session Manager
The default value for the BootExecute entry is autocheck autochk *. When you use the /x switch in chkntfs, it will add a /k parameter before the asterisk. This parameter excludes volumes from being checked for the presence of a dirty bit.
For example, if I run the command “chkntfs /x c:” in a command prompt, this would modify the registry entry to autocheck autochk /k:c *
There are some experts who believe that it is better not to disable Check disk from scanning your hard drive. But as for me, I don’t want it to scan my hard drive because if it finds anything bad, damaged files will be changed to File00001.CHK. When that happens, I’ll have to use data recovery software or some third party tools to recognize and recover the CHK files.
You can also use the chkntfs command to reset the BootExecute registry value back to the default of autocheck autochk * if you need to for any reason.
chkntfs /dThere is also a command to schedule a specific drive to be checked at boot. Autochk will run if the drive is marked as dirty. Simply supply the drive letter(s) after the command.
chkntfs /c c:Power Tip: One easy way to determine if a drive letter requires auto chkkdsk on boot is to run the command fsutil dirty query c: in command prompt. If the fsutil tool reports that the drive letter is not dirty, the disk checking process will not want to run for that drive. However when a drive letter is being marked as dirty, we discovered that only one hex value on the drive is being modified and resetting the dirty bit hex value to default number will magically stop the auto disk check on boot. sumber : http://www.raymond.cc/blog/disable-or-stop-auto-chkdsk-during-windows-startup/
Membuka Semua Spoiler Kaskus Sekali Klik

1.Install Greasemonkey di firefox disini
2.Setelah diinstal di firefox , install lagi script Kaskus All Spoiler Expander disini
3.Klik Install
4.Setelah diinstall , lihat efeknya di kaskus, akan ada tombol baru yang akan membuka semua spoiler
Blokir Acces Ke Control Panel
Hampir dua minggu lebih menginstal ulang 40 komputer di laboratorium SMK N 2 Kuningan, sungguh melelahkan sampai-sampai blog ini tidak diisi posting .. boro-boro chating… pusing.
Dari sekian banyak koomputer yang dinstal ulang, permasalahan yang ditemukan adalah klasik, diantaranya :
Setelah tiga minggu berjalan alhamdulilah tidak ada yang neko-neko, kalau pun ada tinggal restore aja pake system restore.
Berikut adalah konfigurasi untuk PC di lab :
 Gambar 1
Gambar 2
Read more
Dari sekian banyak koomputer yang dinstal ulang, permasalahan yang ditemukan adalah klasik, diantaranya :
- Virus, worm dari IRC
- Seting Desktop yang macam-macam mulai dari backgroud, screensaver, apperance, dll.
- Banyak software-software yang tidak diharapkan terinstall malah bercokol di PC
Setelah tiga minggu berjalan alhamdulilah tidak ada yang neko-neko, kalau pun ada tinggal restore aja pake system restore.
Berikut adalah konfigurasi untuk PC di lab :
- Install Norton AV 2003 langsung update seminggu sekali
- Install Spyware Remover Pake AD AWARE 2007, update seminggu sekali
- Buat user accout dengan nama siswa (misalnya) dengan tipe LIMITED ACCOUNT, adapun caranya, buka control panel pilih user account, pilih Change the way user logon or of (lihat gambar), hilangkan tanda ceklist pada semua pilihan yang ada, kemudian klik apply.
Gambar 1Gambar 2
- Pada gambar 1 Pilih Create a New Account, ketik nama nya, kmudian pilih type account nya. (lihat gambar)
 Gambar 3
 Gambar 4
 - Sekrang log of dari administrator dan login ke account yang dibuat diatas misal siswa caranya klik strart turn off/shutdown pilih log off administrator, klik OK
- Sekarang anda telah login sebagai siswa (limited account), ubah seting desktop sesuai dengan yang diharapkan misal screen saver di non aktifkan, background di none kan apperance nya winddows clasic, kilk apply, dan log off dari user siswa dengan cara yang sama pada saat log off dari administrator (lihat langkah sebelumnya).
- Anda login lagi sebagai administrator, kemudian kita blokir akses ke control panel, klik start — > Run, ketik gpedit.msc klik ok atau tekan enter , maka akan tampil gambar berikut :

- DAri Tampilan diatas pilih User Configuration –> Administrative Templates –> Control Panel, Double Klik Prohibit access to the Control Panel, ubah setingnya supaya menjadi Enable, terus pilih yang lainnya supaya menjadi disable, kecuali, Force classic Control Panel ubah ke Enable, seetelah selesai, tutup windows group polices editor, kemudian logout dan login kembali sebagai siswa (limited account):

- Sekarang anda di dekstop account siswa, tidak dapat membuka control panel, atau mengubah screen sever dan lainnya, keculai background masih bisa diubah dari browser internet explorer dengan memilih klik kanan pada gambar dan pilih set as destop background, atau melalui program pengolah image, misal paint dengan memilih menu file set as backgrountd. Cara ini bisa kita blokir cara sebagai berikut:
1. Klik start –> Run
2. Ketik regsvr32 /u shimgvw.dll tekan enter
3. Selesai, silahkan anda buka intenet explorer yang mengandung image kemudian klik kanan cek apakah menu set as desktop background nya non aktif ? kalau ya berarti sukses, begitu juga pada program pengolah gambar coba cek..
Subscribe to:
Posts (Atom)


